Adopt-a-Storm Drain
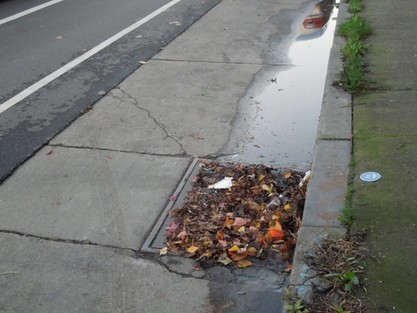
Why should people be concerned about what enters a storm drain? Because anything that is flushed or runs down a storm drain is not “treated” before it reaches a lake, stream, or river. This means that oil, antifreeze, paint, grass clippings and leaves, household waste, pet wastes, or any other waste on streets and sidewalks goes directly into a nearby stream, river, or lake. The next time you wash your car on your driveway, consider where the water goes. The soapy, dirty water runs down the street into the storm sewer. This sewer carries the wash water to a waterbody. In the water, the soap acts like a fertilizer for aquatic plants and causes too much plant growth, which creates problems for fish. You can help increase awareness of the storm drain connection. Educate your community about storm water pollution by stenciling the street next to storm drains and distributing door hanger cards.
How do I get Started?
Contact the Storm Drain Committee here. The committee chair will respond soon with a few additional questions and directions. Complete the application and liability forms and get permission from a parent or guardian (if required) to stencil storm drains from the Public Works department. (You can download and print the application here) Be sure to ask for a letter of authorization to provide you with proof if you are questioned by a road crew or police officer.
Keep weather in mind. Weather conditions are important for the success of this project. You should choose a day when the pavement is dry and warm. Windy days are not good because the spray paint can drift onto nearby automobiles and debris can be blown onto the painted surface.
Follow the map and make sure you only stencil drains identified on the map and that matches those listed with your neighborhood or service group. Get a map section for the neighborhood you wish to stencil from the city public works department.
Notify the neighborhood. A day or two before you plan to paint, distribute door hanger cards or fliers explaining the stenciling program. If you can’t distribute the information ahead of time, have one or two team members distribute the cards and fliers while others paint. Examples of a door hanger card and a flier are included with this unit (the flier can be photocopied). If your group is participating in a large storm drain stenciling project, you may want to make your own door hangers, fliers, or posters, using the opportunity to conduct an all-out education campaign.
How do I stencil a Drain?
Scrub around the drain. Scrub the street area surrounding the storm drain with the wire brush, and use the whisk broom to sweep dirt into the dust pan. Use your garbage bags to take debris away. Do not sweep dirt and debris into the drain.
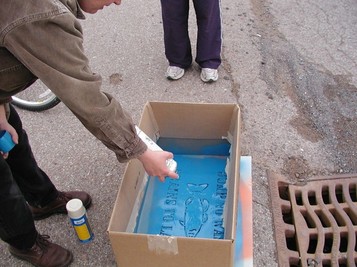
Put the stencil in place. Position the stencil in the gutter next to the storm drain inlet where the message will be most visible. Tape or hold the stencil in place. You might place a cardboard box with its bottom removed over the stencil to create a “wall” that contains drifting paint.
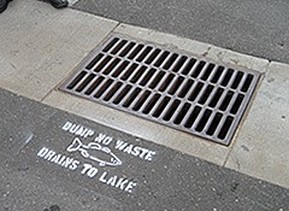
Paint away. Spray paint the message, making sure paint doesn’t get into the storm drain. Two light coats of paint will work better than one heavy coat. Allow the first coat of paint to dry before applying the second coat. The stenciled messages last for approximately two years on a paved surface.
Check for missed drains. When you’re done with the project, have one team member check that all storm drains in your area have been stenciled. It’s easy to miss one.
Clean up. Place the used stencils in a plastic bag or box for transportation. When storing used stencils, allow the paint to dry before stacking them. A stencil’s lifespan is determined by use. Discard the stencil when the message is blurred by excess paint build-up (typically about ten separate events).
Put the stencil in place. Position the stencil in the gutter next to the storm drain inlet where the message will be most visible. Tape or hold the stencil in place. You might place a cardboard box with its bottom removed over the stencil to create a “wall” that contains drifting paint.
Paint away. Spray paint the message, making sure paint doesn’t get into the storm drain. Two light coats of paint will work better than one heavy coat. Allow the first coat of paint to dry before applying the second coat. The stenciled messages last for approximately two years on a paved surface.
Check for missed drains. When you’re done with the project, have one team member check that all storm drains in your area have been stenciled. It’s easy to miss one.
Clean up. Place the used stencils in a plastic bag or box for transportation. When storing used stencils, allow the paint to dry before stacking them. A stencil’s lifespan is determined by use. Discard the stencil when the message is blurred by excess paint build-up (typically about ten separate events).
What Do I Need to Stencil?
Healthy Lake Winona has teamed up with the City of Winona's Public Works and Parks and Recreation departments to provide kits that you can check out to stencil drains in your neighborhood. Simply contact the Healthy Lake Winona Storm Drain Committee Public here. to schedule your stenciling day. Be sure to complete the application and liability forms before your schedule your stenciling day.
Contents
1 - 5 Gallon Bucket with lid
1 – Stencil
1 – Wire Brush
1 – Whisk Brush
1 – Small Dust Pan
3 – Pair Work Gloves
2 - Garbage Bags
1 – Paper Towel Roll
1 – Pair Scissors
3 - Safety Cones
5 Safety Vests
Spray Paint
Door Hanger Cards/Flyers
Map of Stenciling Area
Application/Sign-up Form for Group
Parent/Guardian Permission Slips
Track your Progress
The community and the city want to follow your progress. A tracking sheet has been developed to help you record the location of the storm drains you have stenciled. In addition we would like you to take pictures of your group as a whole and while stenciling drains. We encourage you to send them to the local newspapers and let them know who participated in the stenciling and where you did your work. Please dpwnload the tracking sheet here and print it out to use during your day stenciling drains. If you have a cell phone with GPS the latitude and longitude of the drains is most helpful, otherwise simply provide the cross streets. Tracking Log

